Friday 25 April 2008

Media player in MOSS 2007

Hiiiiiii,

Actually one of our client wants to embed a video player in a SharePoint site. for that -
Add a Content Editor Web Part onto your page, and click on the Source Editor where you could input the following HTML, and update the URL value accordingly. Parameters could be added or removed according to your needs.


Here the Class ID is Key Player.

The correct class ID for Windows Media Player 7 and later is: clsid:6BF52A52-394A-11D3-B153-00C04F79FAA6.
Many places on the internet it states that the
class ID should be: clsid:22D6F312-B0F6-11D0-94AB-0080C74C7E95.
This class ID is the old one, but it will work, because of backward compability. However, if you use the old class ID you will not be able to use the new features added to the component.

Windows Media Player 10
clsid:6BF52A52-394A-11D3-B153-00C04F79FAA6 (same as WMP7)

Windows Media Player 9
clsid:6BF52A52-394A-11D3-B153-00C04F79FAA6 (same as WMP7)

Windows Media Player 7
clsid:6BF52A52-394A-11D3-B153-00C04F79FAA6

Windows Media Player 6.4
clsid:22D6F312-B0F6-11D0-94AB-0080C74C7E95

--------------- Have A Nice Time !!! ---------------------

Google Gadgets in MOSS 2007

Hiiiiiii ,

If you haven’t seen them yet Google Gadgets (http://www.google.com/ig/directory?synd=open) are cool little web based components that you can include on the Google home page and inside your own pages. They are really easy for the community to build so there are all kinds of cool little apps like conversion calculators, daily image feeds, stock tickers, and even asteroids. They are great for easily and quickly adding little chunks of functionality to a website. MS has similar things for windows live that they call widgets.


To add a google gadget to a SharePoint page…
  1. Go to the google gadgets site(http://www.google.com/ig/directory?synd=open) and find the one you want and click on the title.
  2. Then just click the add to your webpage button.
  3. Adjust the available settings to your likings and click the “Get the code” button. Copy the code it generates to the clipboard.
  4. Now go to your SharePoint site and add new content editor web part the page you want the gadget on.
  5. Click the web part menu (little triangle in the top right) of the content editor web part and go to Modify shared web part.
  6. In the tool pane click the source editor button and then paste the contents of your clipboard in the window that appears. Click Save on the pop and then OK on the tool pane.

----------------- Have A Nice Time !!! --------------------

Monday 14 April 2008

Functions for use in a MOSS 2007 column ([Today], [Me], etc.)

Hiiiiiiiiiiiiiiii,

Following the recent questions from my last post I thought it would be useful to highlight what functions are available when creating a column in a list/library within MOSS 2007.

This can be useful when creating:
1). Calculated column based on other columns within a list/library. For example, to calculate the number of days difference between a list item being Created and Modified.
2). View of a list/library that shows items that meet a certain criteria. For example, a View showing the tasks assigned to me.

List of available functions

Tuesday 8 April 2008

Form Authentication for MOSS 2007

Hiiii,

Some of the "latest technologies" in SharePoint, like Master Pages and Forms Authentication, are "not-quite-the-latest technologies" from ASP.NET. In this article, I'll cover some of the quirks to Forms Authentication that you will doubtless encounter when trying to set it up in SharePoint.

A guide to configuring Forms authentication in SharePoint 2007

Steps for setting up Forms Authentication in SharePoint 2007
1)Setup the membership data store
2)Add a new user to the membership data store
3)Configure SharePoint Central Administration web.config
4)Configure the SharePoint site's web.config
5)Enable Forms authentication on the SharePoint site
6)Authorize the Forms-based user to access the site
7)Login

In this article, we will be using the SQL Server membership provider to authenticate users, but you can use any membership provider that you so choose. The steps involved will be about same, but the specifics of those steps may change depending on your provider. I'm also assuming that you've already installed SharePoint and created the SharePoint site on which you're trying to enable forms authentication.

Step 1: Setup the membership data store

Before you can use the SQL Server membership provider, you have to set up the database that the provider uses to store member and role information. Microsoft ships a handy tool named the ASP.NET SQL Server Setup Wizard along with the .NET Framework, which will guide you through the process of creating the table structure and stored procedures required for the provider. You can launch the wizard by running aspnet_regsql.exe from the .NET Framework folder, which is normally found in the following location:

\Microsoft.NET\Framework\\aspnet_regsql.exe

C:\Windows\Microsoft.NET\Framework\v2.0.50727\aspnet_regsql.exe

When you launch the wizard, the "Welcome" screen appears and tells you all sorts of useful things about what the wizard does and the command line parameters you can use to get more options. It makes for great reading. When you've satisfied your literary pallet, click the Next button to display the "Select a Setup Option" screen (Figure 1).


Figure 1 – ASP.NET SQL Server Setup Wizard – Select a Setup Option screen

From the "Select a Setup Option" screen, choose the "Configure SQL Server for application services" option button. This lets the wizard know you want to add new tables and stored procedures to a membership database. You can also use the wizard to remove the table structure and delete all data in the database, but we don't need to deal with that right now. If you accidentally add the structure to the wrong dataset, you may have to deal with it later. Click "Next" to move to the "Select the Server and Database" screen (Figure 2).


Figure 2 – ASP.NET SQL Server Setup Wizard – Select the Server and Database screen

Enter the name of your database server in the Server textbox to let the wizard know which SQL Server it needs to access. Then enter or select a database name in the Database combo box. The combo box displays a drop down containing a list of existing databases. If you want to add the tables and stored procedures for the provider to an existing database, select the database from the list. If you want to create a new database, then just type the name of the new database directly in the combo box and the wizard will create the database automatically. You may also need to enter SQL Server authentication credentials if you connect to the database using SQL Server authentication instead of Windows authentication. These credentials are not used outside of the wizard, so it won't affect your SharePoint configuration one way or the other. Click the Next button to continue to the "Confirm Your Settings" screen.

The "Confirm Your Settings" screen displays a summary of the epoch-defining choices you've made thus far in the wizard. In other words, the server and database name. If you're feeling hesitant about either, then this is your chance to back out. When you've got your courage built up, click the Next button.

In about a second, or about one and half seconds if you're using a Virtual PC image (like me), the wizard creates all of the tables and stored procedures required by the membership provider. If it takes longer than that, you've entered a setting incorrectly and the wizard is waiting to time out (or you have a really slow machine). The wizard then displays a final status screen indicating success or failure. If the wizard fails, it details the reasons why so you can fix the problem. There are only six settings in the entire wizard (if you count option buttons as "settings") so you should have a sporting chance at troubleshooting the problem. The success screen just tells you that everything worked and to click the Finish button.

At this point, the database you selected is populated with the proper table structure and stored procedures required by the provider, so now you can add a user to the membership database.


Step 2: Add a user to the membership data store

In IIS 7.0, there is a convenient "Add User" feature that uses the membership provider configured for the website to create a user. Unfortunately, IIS 7.0 isn't available for Windows Server 2003 so, in a production environment, you're probably stuck with IIS 6.0, which doesn't have a comparable add user feature. This makes adding users a bit tedious, but here's how you do it.

1)Create a new ASP.NET web application
2)Configure the new application for Forms authentication and point it at your newly-created membership database
3)Copy the machine key element from your SharePoint site's Web.config into to your new web application
4)Add users and roles using the ASP.NET Web Site Administration Tool (if you have Visual Studio 2005 handy) or create users via the CreateUserWizard ASP.NET control.

I'm assuming you know how to create a new web site, so I'm not delving into any of the specifics of step 1. Once you have the website created, add a new Web.config to the application root and add the following configuration setting to the file:

List 1 – Web.config for the User Creation Website


I've bolded a few areas of Listing 01 because you will need to modify them to work on your system:

Replace the machineKey element from the listing with the machine key element in the Web.config from your SharePoint site. The machine key from the listing is the machineKey from my SharePoint site (on a VPC local to my box, so calm down you crazy Hax0rs) so it won't do you much good. The machineKey element changes from site to site, so make sure you get it from the site you want to configure for Forms authentication and not another site, or the SharePoint Central Administration site. You need matching machineKeys in the web application and the SharePoint site because user passwords are hashed (one way encrypted) and the hash routine uses the machine key value as part of the hashing algorithm.

Make sure your connection string points at the appropriate server that houses the membership database you just created. Also make sure the appropriate credentials are supplied to the connection string.
You can name your connection string anything you want, just make sure you use the same name later on in the connectionStrngName parameter for the membership and roleManager provider configurations.

Make sure your applicationName parameters match in both the membership and roleManager provider configurations. The SqlMembershipProvider allows multiple applications to use the same membership database, so a mismatched name makes the provider think there are two applications instead of one and your members and roles won't associate correctly.
Feel free to configure the password settings of the membership provider as you see fit.
Once you have the configuration settings in place for your web application, you need a way to add users. If you are using Visual Studio 2005, you can use the built-in Web Site Administration Tool:

Click the Website menu and choose the ASP.NET Configuration menu item. This launches a new web browser window that displays the Web Site Administration Tool.
Click on the Security tab or link.
Click on the Create User link and create a new user. Remember the login information because you'll be needing it later.
If you do not have Visual Studio 2005, then you can use the CreateUserWizard control to add a new user to the membership database. It's not as nice as the Web Site Administration Tool interface, but it does get the job done. Create a new page named CreateUser.aspx and add the following markup to the file:

List 2 – CreateUser.aspx


Once you save the file, navigate to the CreateUser.aspx page using your browser and create a new user. One way or another, you should have a user in the membership database at this point.

Step 3: Configure SharePoint Central Administration Web.config

Now that you have a user in the membership database, you've got to let SharePoint know that the user exists and grant the user access to your SharePoint site, which means configuring your site to use Forms authentication. You configure authentication through the SharePoint Central Administration web interface, but Central Administration needs to know about your membership and roleManager providers before that configuration can take place. That means you have to add the appropriate , , and configuration elements to the Central Administration Web.config. The configuration for Central Administration is almost identical to Listing 01, but this time around you do NOT set the defaultProvider attribute on the and elements, and do not set the enabled attribute on the element. Also, the Web.config for Central Administration already contains a great deal of configuration data, so make sure you do not accidentally remove or modify any existing settings.

Open the Central Administration's Web.config. If you do not know where this is located, use the IIS Manager to determine the home directory for Central Administration and open the Web.config from that directory.

Add the following configuration elements to the Central Administration's Web.config. Please note that some element, like , , and , may already exist in the Web.config. If they do, add the child elements to the existing item.

List 3 – Additions to the Central Administration Web.config


Now the Central Administration knows about your provider configurations. You would think that having the information in the "SharePoint Central Administration" would be enough, but no. You've got to add it to the Web.config in your SharePoint site as well.

NOTE: Notice that Listing 03 never refers to the machineKey. Not even once. This is because you should not mess with the machineKey in SharePoint Central Administration. Leave it alone. Do not change it. Do not delete it. Your provider does not do any encrypting or hashing from the Central Administration, so you don't have to synchronize the machineKey between the two sites. If you change the machineKey in Central Administration, bad things could happen.

Step 4: Configure SharePoint Site Web.config

At this point, you should be tired of messing with configuration settings, but the end is near. Go ahead and open the Web.config in the root directory of your SharePoint site, and make the same changes that you made to the SharePoint Central Administration's Web.config. Use Listing 03 as your guide. When you are finished, you need to set the defaultProvider attributes in the and elements, and the enabled attribute in the element, as shown in Listing 04.

List 4 – Attributes that appear in the SharePoint site Web.config (but not in the Central Administration Web.config)


Once you've entered the configuration settings, SharePoint Central Administration and your SharePoint site have the settings required to enable Forms authentication. Time to jump back to the SharePoint Central Administration site.

Step 5: Enable Forms Authentication on the SharePoint site

You enable Forms Authentication for SharePoint sites using SharePoint Central Administration. Navigate to the Central Admin site using your browser. You can normally find a shortcut to the site in the Start menu:

Programs > Office Server 2007 > SharePoint 3.0 Central Administration

Once the Central Administration Home page is loaded, click on the Application Management link on the left hand navigation bar. You are taken to the Application Management page, which displays a variety of administration links. Click on the Authentication Providers link under the Application Security section on the right hand column of the page. The Authentication Providers page loads, as shown in Figure 3.


Figure 3 – Authentication Providers screen

When working in SharePoint Central Administration website, make sure the correct Web Application is selected when you are about to change configuration settings; otherwise you'll be applying changes to the wrong site. There's a small light-blue bar in the content pane of the page that displays the current Web Application URL. Make sure it's the web application on which you want to enable Forms authentication. If it's not, click the little down-arrow next to the URL and choose "Change Web Application" from the drop down list. SharePoint then displays a popup window with a list of web application from which you may choose.

Once you have the right web application selected, the Authentication Providers page displays a list of the zones in that application. Click on the name of the zone in which you want to enable Forms authentication. The Edit Authentication page displays (Figure 4).


Figure 4 – Edit Authentication Page

In the Edit Authentication page, choose the "Forms" option for Authentication Type. The page refreshes and displays the Membership provider and Role manager sections. Enter DemoMembershipProvider in the Membership provider name textbox, and DemoRoleProvider in the Role manager name textbox, then click the Save button. You are taken back to the Authentication Providers screen, but your zone should now say DemoMembershipProvider under the Membership Provider Name column. Forms authentication is now enabled on the site.

Step 6: Authorize the Forms-based user to access the site

Now that Forms authentication is enabled on the site, you can hit the site and see the login form (Figure 6). Microsoft spared no expense making this the blandest form you'll ever see. You will probably want to customize it so it looks a lot nicer. Maybe include some text about how the user should enter their username and password. Nobody will read it, but it definitely makes a login form look like a login form. Anyway, if you enter your username and password, you will be successfully authenticated and then promptly denied access because you have no authorization to be in the site. So, how do you get authorization? You have to use the Site Collection Administrator account.

You may remember setting up a Site Collection Administrator when you first created the site a while back, and it was almost certainly a Windows user account. If you extended the site and have both a Windows zone and a Forms authentication zone, then you can login to the Windows zone and setup the Forms user in Site Settings as you would any other user.

If you have not extended the site, then you've only got one zone and its using Forms authentication. As such, the Windows account associated with the site collection administrator is effectively useless and you need to change the site collection administrator over to a Forms based account. To do this, open SharePoint Central Administration and click on the Application Management link in the left navigation menu. When the Application Management page displays, click the Site Collection Administrators link under the SharePoint Site Management section in the left-hand column of the page. The Site Collection Administrators page displays (Figure 5).


Figure 5 – Site Collection Administrators Page

On the Site Collection Administrators page, make sure that correct site collection is selected. Then, enter the username of the user you created back in Step 2 in the Primary Site Collection Administrator textbox. Click on the Check Names icon (the little red guy with a check mark) next to the textbox. It may take a few seconds, but the page should underline the text in the textbox indicating that the username is valid. If the username is not valid, the page puts a red squiggly line under the username and informs you that the user was not found. If the user is not found, make sure you typed the name correctly. If the issue persists, go back and check your configuration settings to ensure the connection string is valid and there are no typos.

Click on the OK button to save the changes. Your Forms authentication account is now a Site Collection Administrator who has authorization to visit the site. You can use that account to get into the site and setup additional Forms authentication users in Site Settings.

Step 7: Login
When you access the site, you are presented with the previously-mentioned default SharePoint login page (Figure 6). Enter your username and password, and then click the Sign In button. You should be authenticated and authorized, and the site should display as you would expect.


Figure 6 – SharePoint Forms Authentication Login Page

Finally :
Enter testUser(AmitC) as user name and password as password and click on Sign In button.

Please see the image below:


............. Yes :) ...............
--------------- Have A Nice Time !!! ------------------

Monday 7 April 2008

Disabling MySites in MOSS 2007

Hiiiii,

Disabling MySites in MOSS 2007

I received a great question today from a customer about how to disable Personal Site (My Site) creation in Microsoft Office SharePoint Server (MOSS) 2007.

While Personal Sites are a great feature that enable you to provide personalized collaboration tools to each one of your end users, some organizations would prefer to introduce SharePoint features in a phased way. Rather than spinning up every single feature, they would rather get people comfortable with the basic feature sets of collaboration sites and portal functions before trying to replace personal and public file shares with web based alternatives. This is a true paradigm shift in the way most users collaborate and needs to be well planned and communicated to ensure easy adoption and reduced calls to the helpdesk.

So back to how you turn off access to the My Site link in the top right corner of the Portal. This feature is actually governed by a permission that is given to the user group "NT Authority\Authenticated Users" by default when you install MOSS. By default any authenticated user that accesses the Portal site will see the link in the top right corner for My Site.


You can modify this setting by going to SharePoint Central Administration and clicking on the Shared Service Provider that was created on install and hosts your My Sites (usually called SharedService1) as depicted below.


This will take you to the Shared Services Administration Page where you can now set permissions for Personalization Services by clicking the link with that name as depicted below.


You will then be presented with the list of group that have Personalization rights on your site. The one you want to modify is NT Authority\Authenticated Users by clicking the group and removing the checkmark next to the Create Personal Site setting as you can see below.


Now you can see that when you visit the site as a typical user, the My Site link has been security trimmed from the interface. You can also add specific AD Groups and give them permission to create personal sites to control the feature yet allow it to be used by a select group of users. This would be a great way to rollout the feature in pilot form to see how the adoption rate goes and get feedback.


Oh, here You win !!!!!! :)

--------------- Have A Nice Time !!! -------------

Alternate access mappings in MOSS 2007

Hi ,

Here i discussed about, How do you can plan for alternate access mappings in your MOSS 2007 environment.

In this article, I will discuss on :

About alternate access mappings
Reverse proxy publishing
Alternate access mapping integration with authentication providers
Alternate access mapping integration with Web application policies
Alternate access mapping and external resource mapping
Troubleshooting alternate access mappings

Alternate access mappings direct users to the correct URLs during their interaction with Microsoft Office SharePoint Server 2007 (while browsing to the home page of a Office SharePoint Server 2007 Web site, for example). Alternate access mappings enable Office SharePoint Server 2007 to map Web requests to the correct Web applications and sites, and they enable Office SharePoint Server 2007 to serve the correct content back to the user.

Alternate access mappings have been implemented because there are common Internet deployment scenarios in which the URL of a Web request received by Internet Information Services (IIS) is not the same as the URL that was typed by an end user. This is most likely to occur in deployment scenarios that include reverse proxy publishing and load balancing.


About alternate access mappings

Alternate access mappings enable a Web application that receives a request for an internal URL, in one of the five authentication zones, to return pages that contain links to the public URL for the zone. You can associate a Web application with a collection of mappings between internal and public URLs. Internal refers to the URL of a Web request as it is received by Office SharePoint Server 2007. Public refers to the URL of an externally accessible Web site. The public URL is the base URL that Office SharePoint Server 2007 uses in the pages that it returns. If the internal URL has been modified by a reverse proxy device, it can differ from the public URL.

Multiple internal URLs can be associated with a single public URL. Mapping collections can contain up to five authentication zones, but each zone can only have a single public URL. Mapping collections correspond to the following authentication zones:

Default

Intranet

Internet

Custom

Extranet


Reverse proxy publishing

A reverse proxy is a device that sits between end users and your Web server. All requests to your Web server are first received by the reverse proxy device and, if those requests pass the proxy's security filtering, the proxy forwards the requests to your Web server. Reverse proxies can perform advanced functionality, such as receiving a Web request over the Internet by using HTTPS (Hypertext Transfer Protocol over Secure Socket Layer), but forward the request to the server by using HTTP. This is referred to as "off-box SSL termination." Reverse proxies can forward the request to a port number other than the port on which the request was originally received. Reverse proxies can also change the HTTP Host header field.

Office SharePoint Server 2007 is compatible with many reverse proxy servers, but in the following example the publishing rule is from the reverse proxy software, Microsoft Internet Security and Acceleration (ISA) Server 2006. ISA Server 2006 includes a publishing wizard to help you create a publishing rule for Office SharePoint Server 2007. After the rule is created, you can modify it at any time.
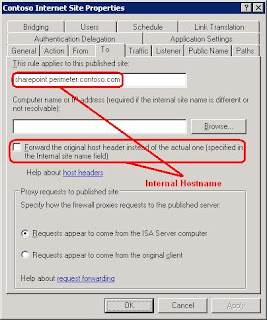

Configuring the reverse proxy server

The first two figures in this example show a modified publishing rule where the Forward the original Host header option is turned off to help demonstrate the flexibility of alternate access mapping. If the Forward the original Host header option is selected, the public hostname also serves as the internal hostname when configuring alternate access mapping.

The following figures show the Listener tab and Public Name tab on the properties sheet for the rule. These properties define the URL to use to access your Web application. This URL is actually the URL of your reverse proxy server, which forwards the request to your server running Office SharePoint Server 2007.


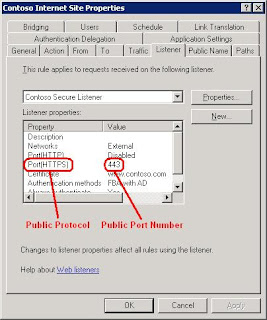
The end user's URL is made up of the public protocol, the public hostname, and the public port number, as shown in the following table.

Public protocol Public Hostname Public port number Public URL
HTTPS + "://" + www.contoso.com + ":" + 443 = https://www.contoso.com


The following figures show the To tab and Bridging tab on the properties page for the rule. These properties define the URL that the reverse proxy server uses to forward the request to your server running Office SharePoint Server 2007.


Configuring the SharePoint Web application
After you have configured the reverse proxy server publishing rule, configure your Web application and alternate access mappings to match the publishing rule. You can do this by extending an existing Web application to an additional IIS Web site specifically for the reverse proxy publishing rule. You can also create a new Web application for this publishing rule. The values you need to enter are the same in either case.

Use the following procedure to extend an existing Web application.

Extend an existing Web application

1) From Administrative Tools, open the SharePoint Central Administration Web site.
2) On the Central Administration home page, click Application Management.
3) On the Application Management page, in the SharePoint Web Application Management section, click Create or extend Web application.
4) On the Create or Extend Web Application page, click Extend an existing Web application.
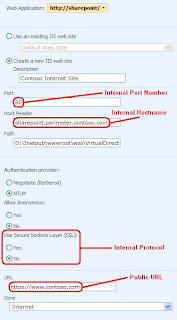
5) On the Extend Web Application to Another IIS Web Site page, select a Web application. When you have selected a Web application, enter values for the port, Host header, and SSL fields, based on the internal URL properties defined in "Configuring the reverse proxy server" earlier in this article. In the URL field, enter the public URL defined in "Configuring the reverse proxy server," as shown in the following figure.


6) Select an alternate access mapping zone to assign this extension of your Web application to. There are a maximum of five zones available for each Web application. In this example, we will use the Internet zone. All of the zones provide the same functionality, although the Default zone will always be used for certain features, such as sending administrative e-mail messages to site collection owners.
7) To create the IIS Web site, click OK.

After you have completed these procedures, verify that your public URL was created correctly in alternate access mappings and then add your internal URL. Unless your internal URL is the same as your public URL, this is an extra step that you must perform manually.

Use the following procedure to view the Alternate Access Mappings page.

View the Alternate Access Mappings page

1) From Administrative Tools, open Central Administration.
2) On the Central Administration home page, click Operations.
3) On the Operations page, in the Global Configuration section, click Alternate access mappings.
4) On the Alternate Access Mappings page, select the Web application to publish through the reverse proxy server.

At this point, you should see alternate access mapping URLs assigned to your Web application, as shown in the following figure.


The public URL from the reverse proxy publishing rule has been assigned to the Internet zone of your Web application. Use the following procedure to add the internal URL from the reverse proxy publishing rule to the Internet zone of your Web application.

Add the internal URL from the reverse proxy publishing rule to the Internet zone of your Web application

1) On the Alternate Access Mappings page, click Add Internal URLs.
2) Type the name of the internal URL and select the same zone that you used for the public URL. In this example, we will use the Internet zone.
3) Click Save.

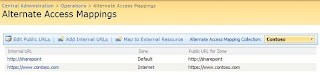
At this point, you should see that the additional URL is assigned to your Web application (in the same zone as the public URL of your reverse proxy publishing rule), as shown in the following figure.


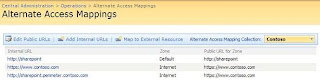
When a user browses to https://www.contoso.com, the Web request will be received by the reverse proxy server and forwarded to http://sharepoint.perimeter.contoso.com. Office SharePoint Server 2007 will then receive the Web request, see that the URL of the request is http://sharepoint.perimeter.contoso.com, find that this URL is assigned to the Contoso Web application, and return the content from that Web application. In addition, because the http://sharepoint.perimeter.contoso.com URL is assigned to the Internet zone, Office SharePoint Server 2007 will generate links on the pages by using the public URL for that zone: https://www.contoso.com. This ensures that end users are taken to the proper URL when clicking links on the page.

Load balancers work similarly, especially if they overwrite the end user's original URL with the URL of the individual Web server that the request is being load balanced to. To account for these overwritten URLs, just add the alternate access mappings for the URLs of each individual Web server, as internal URLs, and associate them to the same zone as the public URL of the end user. If they preserve the original URL, then simply have the original URL be the public URL.

Alternate access mapping integration with authentication providers
Alternate access mappings allow you to expose a Web application in as many as five different zones, with a different IIS Web site backing each zone.

Not only do these zones allow you to use multiple URLs to access the same Web application, they also allow you to use multiple authentication providers to access the same Web application.

When extending a Web application into a zone, you have to use Windows authentication provided by IIS. After the Web application has been extended into the zone, you can modify the zone to use a different type of authentication.

Use the following procedure to modify the authentication configuration for a zone.

Modify the authentication configuration for a zone

1)From Administrative Tools, open Central Administration.
2) On the Central Administration home page, click Application Management.
3) On the Application Management page, in the Application Security section, click Authentication providers.
4) On the Authentication Providers page, select your Web application, listed in the Web Application box.
5) Click the name of the zone whose authentication configuration you want to modify.
6) On the Edit Authentication page, in the Authentication Type section, select the authentication type you want to use for this zone:

Windows

Forms

Web single sign on


7) Modify any other authentication configuration settings that you want to change and click Save.

At this point, you can change authentication configuration settings for any other zone as well. You can configure completely independent authentication settings for different zones accessing the same content. For example, you might configure some content to be anonymously accessible while other content requires credentials. You could configure one zone to have anonymous access enabled and all other forms of authentication disabled, guaranteeing that only the anonymous content will be accessible. At the same time, another zone can have anonymous access disabled while NTLM authentication is enabled, guaranteeing that only authenticated access will be allowed. In addition, you can have different types of accounts to access the same content: one zone can be configured to use Windows Active Directory accounts while another zone can be configured to use non–Active Directory accounts with ASP.NET forms-based authentication.

Alternate access mapping integration with Web application policies
Web application policies allow administrators to grant or deny access to accounts and security groups for all sites exposed through a zone. This can be useful for a variety of scenarios.

For example, the Office SharePoint Server 2007 search crawler must go through the same authorization infrastructure as everyone else: it can only crawl content that it has access to. However, users would still like search to crawl restricted content so that authorized users can find that content in search results. The search service uses a Full Read policy on the Web applications to give its crawler permission to read all content on that Web application. That way, it can crawl and index all existing and future content, even content that the site administrator has not explicitly given it access to.

Another example would be Helpdesk personnel who need administrative access to Office SharePoint Server 2007 sites so that they can assist users. To do this, you can create a Web application policy that grants the Helpdesk staff accounts Full Control permission so that they have full administrative access to all current and future sites on the Web application.

Because policies are tied to both Web applications and their zones, you can ensure that the policy you have applied to one zone does not affect other zones. This can be useful if you have content exposed both on the corporate network and to the Internet. For example, suppose you have given a Helpdesk staff account Full Control permission over a Web application's zone that has been assigned to the corporate network. If someone were to try to use that account to access the site over the Internet, that Full Control policy would not apply because it would recognize that the URL is in a different zone. Therefore, the account would not automatically be given administrative access to the site.

Alternate access mapping and external resource mapping
Office SharePoint Server 2007 allows you to extend the alternate access mapping functionality to content that is not hosted within the Office SharePoint Server 2007 farm. To configure this functionality, browse to the Alternate Access Mappings page and click Map to External Resource. You will then be asked to create an entry for an external resource, which you can think of as another Web application. After you have an external resource, you can assign different URLs and zones to it in the same way that you do for Web applications. This feature is not utilized in Office SharePoint Server 2007, but third-party products that build on top of Office SharePoint Server 2007 can make use of it.

For example, the search technology in Office SharePoint Server 2007 is able to crawl content external to the farm such as file shares and Web sites. If that content is available at different URLs on different networks, you would want search to return results by using the appropriate URLs for the user's current network. By using alternate access mapping's external resource mapping technology, search can remap the external URLs in its search results to match the user's zone.

---------- Have A Nice Time ------------------

Friday 4 April 2008

Feature in MOSS 2007

Introduction to Features

What is a feature?
Hi, I am delighted to say that. A feature in MOSS is simply a set of files, be it code, XML, web pages or CAML that will be "installed" into the SharePoint system. This being said, what you can do is actually add or "staple" this feature to a site definition so that when a new site is created, the feature will be activated as well. What you can put in a feature is really whatever you can dream up. You can add web parts, master pages, lists, fill lists with data, event receivers attached to the lists, etc. Hopefully, you are starting to understand the real scope of this here. As you can see, this is the recommended way of deploying your SharePoint Changes through the normal SDLC.

A feature can be installed on many levels or "scopes".
Farm
A farm feature is always activated and would be things like links to _layouts pages
Web Application
These would be items like Admin Links and global assemblies
Site Collection
These could be items like Web Parts, Workflows and Content Types
Site
These could be things like item receivers and list instances.

There are three types of file groups that are involved in a feature

The first and most obvious file will be the Feature.xml file. This file will be in a subdirectory (usually your feature name) under the 12 hive (\program files\common files\microsoft shared\web server extensions\12\templates\features. We are going to call our feature ItemReceivers in our example.
The second is the Element Manifest.XML file. This file is referenced by the Feature.xml file and houses pointers to all the files that will be provisioned as well as any setup for those files including CAML code.
The third are the files referenced by the Element Manifest file. These files would include aspx pages, dll's, and anything else you would likely deploy to SharePoint.

Feature
The first thing that you obviously have to do is decide on what you are going to build and add as a feature. We are going to deploy the item receiver that we built here as a feature.

Feature File
In building the feature file you will first need to generate a unique GUID for the feature itself. You can find instructions for this here. After this you will have to point to write the base XML for the feature file. It will look something like this:


Elements Manifest File

Your manifest file will act exactly as it sounds by outlining all files and placement of these files and will look something like this:


Please note that the Assembly and Class information were retrieved using the mechanism described here.

Important: Please note that there are a couple limitations to using the "Receivers" approach. You cannot associate this to a particular list instance only a type of list. You will probably want to make your own type anyway; however, this is a limitation. Also, you can only scope this at a site level. Both of these limitations can be overcome by using solution packages which will be discussed in a later post.

Manually Deploying your Feature
The first thing you will have to do is make sure that the files are copied to the correct place. You will open the command prompt and navigate to your bin folder for SharePoint.

xcopy "c:\[PathToFeatureFiles]" "c:\program files\common files\microsoft shared\web server extensions\12\templates\features" /s /y


Please GAC the assembly of your receiver by following the instructions here.

You then will need to install the feature to your SharePoint Server

stsadm -o installfeature –filename Receivers\feature.xml


Finally, you will have to activate your feature for the site

stsadm -o activatefeature -filename Receivers\feature.xml -url http://[YourSite]


--------- Have A Nice Time !!! ----------

SharePoint Architecture

SharePoint Architecture

User Management in SharePoint with different options and architecture is a very complex subject, and thus it will be worthwhile for us to discuss and understand the out-of-the-box SharePoint user management, security and architecture. The chart in Figure 1 represents the logical SharePoint technology architecture. SharePoint is in its third major release and is comprised of Windows SharePoint Services (WSS) version 3.0 and Microsoft Office SharePoint Server (MOSS) 2007. WSS v3 is a free add-on to the Windows 2003 Server, running on top of SQL Server, Windows 2003 Server and ASP.NET 2.0. MOSS is available in various editions (Standard vs. Enterprise) and options (Excel Services, Content Management, etc.), and runs on top of WSS.


Figure 1: SharePoint Architecture Overview

Since MOSS is built on Windows SharePoint Services (WSS), they share similar architecture and foundations. MOSS provides more application level features and services. It also has different and more extensive User Profile management than WSS. The important point about this architecture is that SharePoint relies on many user management and security principles from the Network Operating system, Microsoft Internet Information Services (IIS) and ASP.Net foundation. In the rest of this section we will take a look at:

· WSS and MOSS architecture

· SharePoint Security (Authentication and Authorization)

· SharePoint User Profiles in MOSS and WSS


Windows SharePoint Services Architecture
WSS is the core platform for SharePoint services. WSS is a logical three-tier that contains a Front End Web Server, a Search and Index server and a Database Server (see Figure 2).


Figure 2: WSS Architecture

WSS is essentially a web-based ASP.NET application that extends an IIS web site processing HTML requests through a set of ASP.NET (.aspx) pages, .Net application programming interface (API), and XML web services. It processes and executes the business logic using a combination of .Net and SharePoint objects assemblies. The data is stored in the backend SQL database. SharePoint presents the information to end users in the standard HTML format compatible with most web browsers. An IIS web site that has been extended with WSS is called a Web Application (virtual server in previous WSS versions). SharePoint Web Applications use an HttpModule and an HttpHandler to re-route incoming traffic to the SharePoint business logic, thus enabling the SharePoint Web Application to coexist with other IIS web applications. Note that this architecture also allows SharePoint and other web applications to share the same user security infrastructure, mainly Windows Server and ASP.NET.

The Search and Index server is an executable (MSSearch.exe) that is installed as web services in Windows Server. Its primary job is to index the content of the database to enable searching on SharePoint lists, documents, and files. Note that MOSS uses entirely different search architecture than WSS.

WSS uses Microsoft SQL Server to store both the configuration and the content in the databases. When WSS is installed it creates a configuration database that stores the metadata, physical configuration and information about every web application that has been extended, as well as all the servers and their roles in the farm. WSS also create an Admin database that stores the content of the Central Administrator tool. In addition, for every extended virtual server, WSS creates a Content Database that stores the actual site content. Note that WSS stores the user information in its content database.


Figure 3: WSS Farm Provision

WSS is also designed to be scalable. In a large or medium server farm, you can assign a multiple cluster database backend and install load balanced architecture for the front end web server as shown in Figure 3. Note that there is only a single Configuration database for all SharePoint servers in the farm.

------------ Have A Nice Time !!! -------------